скрипты для acrobat pro
Применение операций и сценариев к файлам PDF
Действие может быть выполнено при щелчке закладки или ссылки или при просмотре страницы. Например, ссылки и закладки можно использовать для перехода к различным местам документа, для выполнения команд из меню и других действий. Действия задаются в диалоговом окне «Свойства».
Для закладок и ссылок указывается действие, которое выполняется при щелчке закладки или ссылки. Для других элементов, таких как страницы, клипы мультимедиа и поля форм, определяется триггер, который запускает действие, а затем определяется само действие. К одному триггеру можно привязать несколько действий.
Параметр Блокировка предотвращает случайное изменение внешнего вида и действий, связанных с объектом.
Добавление операции в закладки, поля формы, кнопки или клипы
Используя инструмент «Рука», правой кнопкой мыши нажмите закладку и выберите Свойства.
Используя инструмент Инструменты > Rich Media > Выбрать объект, нажмите два раза ссылку, клип мультимедиа или поле формы и выберите пункт Свойства.
Щелкните вкладку Действия.
Выберите тип действия в меню Выберите действие и нажмите кнопку Добавить. Можно добавить несколько действий; действия выполняются в том порядке, в котором они показаны в поле со списком Действия.
(Необязательно) Выберите действие на вкладке «Действия» и используйте кнопки, чтобы переупорядочить, редактировать и удалить действие.
Нажмите ОК, чтобы принять действия. Чтобы закрыть инструмент Rich Media, нажмите значок крестика справа на панели инструментов.
Добавление операций с миниатюрами страниц
Чтобы повысить интерактивность работы с документом, можно указать действия, такие как изменение значения масштаба, выполняемые при открытии или закрытии страницы.
Нажмите кнопку Миниатюры страниц слева.
Щелкните вкладку Действия.
В меню Выполнить действие при выберите пункт Открытие страницы, чтобы назначить действие, выполняемое при открытии страницы, или выберите пункт Закрытие страницы, чтобы назначить действие, выполняемое при закрытии страницы.
Выберите действие в меню Выбрать действие и нажмите кнопку Добавить.
Укажите параметры для действия и нажмите кнопку ОК. Доступные параметры зависят от выбранного действия.
Чтобы создать последовательность действий, выберите другое действие из меню и вновь нажмите кнопку Добавить. Используйте кнопки «Вверх» и «Вниз», чтобы расположить действия в том порядке, в котором они должны выполняться.
Если назначено действие, которое включает полноэкранный режим при открытии или закрытии страницы, то в следующий раз при открытии или закрытии той же страницы полноэкранный режим включается.
Закройте все открытые диалоговые окна (при наличии). Щелкните значок крестика справа на панели инструментов, чтобы закрыть инструмент.
Добавление отладки JavaScript
Отладчик JavaScript в Acrobat позволяет построчно просмотреть код, задать точки останова и проверить переменные, используя диалоговое окно отладчика.
Чтобы включить отладчик JavaScript, перейдите к меню «Редактирование» > «Установки» > «JavaScript», а затем установите флажок «Включать отладчик JavaScript после перезагрузки Acrobat».
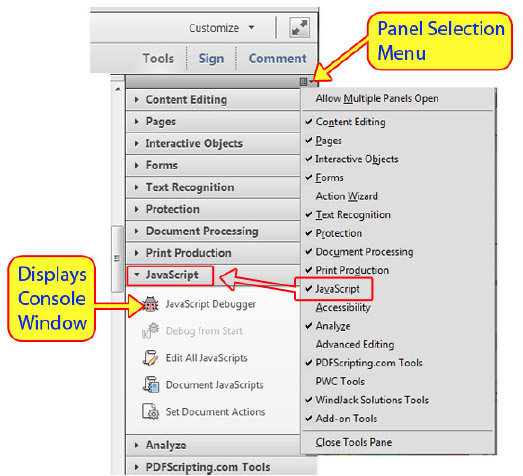
Чтобы запустить отладчик, выберите «Инструменты» > «JavaScript» > «Отладчик».
Управление сценариями JavaScript в документе
Диалоговое окно «Сценарии JavaScript в документе» позволяет добавлять, редактировать или удалять сценарии в текущем документе.
Чтобы открыть данное диалоговое окно, выберите «Инструменты» > «JavaScript» > «Сценарии JavaScript в документе».
Редактор JavaScript
С помощью редактора JavaScript можно создавать и редактировать сценарии.
Чтобы открыть редактор, выберите «Инструменты» > «JavaScript» > «Все сценарии JavaScript».
Действия с документом и JavaScript
Отдельный сценарий JavaScript можно связать с конкретным действием с документом. Такой сценарий выполняется, когда инициируется соответствующее действие.
Чтобы открыть диалоговое окно «Действия с документом», выберите «Инструменты» > «JavaScript» > «Действия с документом».
Выберите действие, а затем щелкните «Изменить», чтобы добавить сценарий к выбранному действию.
Настройка документов PDF с помощью JavaScript
Использование JavaScript — один из самых простых и наиболее мощных способов настройки файлов PDF. Основанный на JavaScript версии 1.5 стандарта ISO-16262 (ранее известной как ECMAScript) JavaScript в программном обеспечении Adobe Acrobat реализует объекты, методы и свойства, которые позволяют управлять файлами PDF, создавать управляемые базами данных файлы PDF, изменять внешний вид файлов PDF и многое другое. Код JavaScript в Acrobat можно связать с конкретным документом PDF, страницей, полем или кнопкой в пределах этого документа либо с полем или кнопкой в файле PDF и даже с действием пользователям.
JavaScript полезен для XML-форм. JavaScript делает возможными автоматическую обработку форм, обмен данными с веб-ресурсами и базами данных, комментирование и другие возможности пользовательского интерфейса. Из файлов PDF, созданных с помощью инструментов Acrobat и Adobe LiveCycle, данные можно извлекать в пользовательские схемы как XML-код. Приложения, написанные на Java и других языках, легко интегрируют Acrobat с веб-службами с помощью протокола SOAP.
Скрипты для acrobat pro
Most sample scripts provided on this page are designed to be run inside Action Wizard’s «actions». Most scripts have comments in the code that will help you to understand the logic and make any custom modifications. EverMap LLC. provides these scripts for reference only, without warranty of any kind (see disclaimer below). No technical support is provided.
DISCLAIMER: All javascripts on this web site are provided «as is» without warranty of any kind either express or implied, including but not limited to the implied warranty of merchantability and fitness for a particular purpose. The entire risk arising out of the use or performance of these scripts and documentation remains with you.
Create page bookmarks Description: Automatically creates a bookmark for each page in the document: Page 1, Page 2, Page 3.
/* Create bookmarks for each page in the document */
var root = this.bookmarkRoot;
try <
for (var i = 0; i Add «Bookmark All Pages» menu to Adobe Acrobat The code below shows how to add «Bookmark All Pages» menu to the Adobe Acrobat interface. Save this code with *.js file extension and place it into JavaScripts folder under Adobe Acrobat installation. For example, for Acrobat DC this folder is located in C:\Program Files (x86)\Adobe\Acrobat 2017\Acrobat\JavaScripts\. It will add «Plug-ins / Bookmark All Pages» menu to the Adobe Acrobat. The menu is disabled if there is no PDF document open.
function BookmarkAllPages()
<
var t = app.thermometer;
t.duration = this.numPages;
t.begin();
/* Create bookmarks for each page in the document */
var root = this.bookmarkRoot;
try <
for (var i = 0; i Delete All Bookmarks The following single line of code will delete all bookmarks from the current PDF document.
/* Trim Bookmark Titles */
function TrimBookmarkTitle(NumChars, Bm, nLevel)
<
var nLevelMax = 2; // change maximum level of the processed bookmarks, starts from 0
if (nLevel > nLevelMax)
<
return;
>
var Title = new String(Bm.name);
Bm.name = Title.substr(0, NumChars); // set bookmark title to first NumChars characters
// Uncomment one of the following lines for a desired action
// Bm.name = Title.substr(-NumChars,NumChars); // set bookmak title to last NumChars
// Bm.name = Title.slice(NumChars,Title.length); // trims first NumChars from the bookmark
// Bm.name = Title.slice(0,-NumChars); // trims last NumChars from the bookmark
// Carbon Copy pages in the PDF file
// IMPORTANT: Set Output Options to the filename you need
// CHANGE THIS NUMBER: IT’S NUMBER OF ADDITIONAL COPIES
var nNumCopies = 2; // make 1 additional copy(es) of each page
var newName = this.path;
var filename = newName.replace(«.pdf»,»_Original.pdf»); // save a copy of original document
this.saveAs(filename);
var Num = this.numPages;
var nNumDups = nNumCopies+1;
for (var i = 0; i Extract email addresses Use this script to extract all email addresses into a new PDF file.
// This script will scan all pages of the input document
// and extract valid email addresses into new PDF document
// Output PDF document will be placed in the same folder
// as input. The name of the output document will be:
// Original filename + «_Extracted_Emails»
// Visit www.evermap.com for more useful JavaScript samples.
var strExt = «_Extracted_Emails.pdf»;
var strIntro = «Email addresses extracted from document: «;
var strFinal = «Total number of email addresses extracted: » ;
function ExtractFromDocument(reMatch, strFileExt, strMessage1, strMessage2)
<
var chWord, numWords;
// construct filename for output document
var filename = this.path.replace(/\.pdf$/, strFileExt);
// create a report document
try <
var ReportDoc = new Report();
var Out = new Object(); // array where we will collect all our emails before outputing them
ReportDoc.writeText(strMessage1 + this.path);
ReportDoc.divide(1); // draw a horizontal divider
ReportDoc.writeText(» «); // write a blank line to output
var nTotal = 0;
var nCounter = 0;
var nLinesPerPages = 60;
for (var i = 0; i nLinesPerPages)
<
ReportDoc.breakPage();
nCounter= 0;
>
>
>
ReportDoc.writeText(» «); // output extra blank line
ReportDoc.divide(1); // draw a horizontal divider
ReportDoc.writeText(strMessage2 + nTotal);
// save report to a document
ReportDoc.save(
<
cDIPath: filename
>);
> // end of the function
/* Extract ISBN numbers From the Document */
// This script will scan all pages of the input document
// and extract valid ISBN numbers into new PDF document.
// Output PDF document will be placed in the same folder
// as input. The name of the output document will be:
// Original filename + «_Extracted_ISBN»
// Visit www.evermap.com for more useful JavaScript samples.
// This is a combination of strict and relaxed versions of ISBN number format
var reISBN=/(ISBN[\:\=\s][\s]*(?=[-0-9xX ]<13>)(?:3+[- ])<3>1*[xX0-9])|(ISBN[\:\=\s][ ]*\d<9,10>[\d|x])/g;
var strExt = «_Extracted_ISBN.pdf»;
var strIntro = «ISBN numbers extracted from document: «;
var strFinal = «Total number of ISBN numbers extracted: » ;
function ExtractFromDocument(reMatch, strFileExt, strMessage1, strMessage2)
<
var chWord, numWords;
// construct filename for output document
var filename = this.path.replace(/\.pdf$/, strFileExt);
// create a report document
try <
var ReportDoc = new Report();
var Out = new Object(); // array where we will collect all our emails before outputing them
ReportDoc.writeText(strMessage1 + this.path);
ReportDoc.divide(1); // draw a horizontal divider
ReportDoc.writeText(» «); // write a blank line to output
for (var i = 0; i Extract Social Security Numbers Use this script to extract all SSN numbers from the document into a new PDF file.
/* Extract US Social Security Numbers From the Document */
// This script will scan all pages of the input document
// and extract :
// Social security numbers:
// Output PDF document will be placed in the same folder
// as input. The name of the output document will be:
// Original filename + «_Extracted_SSNs»
// Visit www.evermap.com for more useful JavaScript samples.
var strExt = «_Extracted_SSNs.pdf»;
var strIntro = «Social Security Numbers extracted from document: «;
var strFinal = «Total number of SSNs extracted: » ;
function ExtractFromDocument(reMatch, strFileExt, strMessage1, strMessage2)
<
var chWord, numWords;
// construct filename for output document
var filename = this.path.replace(/\.pdf$/, strFileExt);
// create a report document
try <
var ReportDoc = new Report();
var Out = new Object(); // array where we will collect all our emails before outputing them
ReportDoc.writeText(strMessage1 + this.path);
ReportDoc.divide(1); // draw a horizontal divider
ReportDoc.writeText(» «); // write a blank line to output
for (var i = 0; i Extract URL addresses Use this script to extract all URL addresses (http,https,ftp,www. ) from the document into a new PDF file.
var strExt = «_Extracted_URLs.pdf»;
var strIntro = «URLs (http,https,ftp,ftps) extracted from document: «;
var strFinal = «Total number of URLs (web addresses) extracted: » ;
function ExtractFromDocument(reMatch, strFileExt, strMessage1, strMessage2)
<
var chWord, numWords;
// construct filename for output document
var filename = this.path.replace(/\.pdf$/, strFileExt);
// create a report document
try <
var ReportDoc = new Report();
var Out = new Object(); // array where we will collect all our emails before outputing them
ReportDoc.writeText(strMessage1 + this.path);
ReportDoc.divide(1); // draw a horizontal divider
ReportDoc.writeText(» «); // write a blank line to output
for (var i = 0; i Rotate Pages In The Document The following script rotates all pages in the document.
/* Rotate all pages (or page range) in the document */
// Modify nStart, nEnd and nRotate to change script logic
try <
if (this.numPages > 0) <
this.setPageRotations(nStart,nEnd,nRotate)
>
>
catch(e)
<
app.alert(«Processing error: «+e)
>
/* Rotate only landscape or portrait pages in the document */
// Modify nStart, nEnd and nRotate to change script logic
for (var i = nStart; i Width) < // portrait
if (!bLandscape) <
this.setPageRotations(i,i,nRotate)
>
>
else < // landscape
if (bLandscape) <
this.setPageRotations(i,i,nRotate)
>
>
>
>
catch(e)
<
app.alert(«Processing error: «+e)
>
try <
var newName = this.path;
var filename = newName.replace(«.pdf»,»_Original.pdf»);
this.saveAs(filename);
for (var i = 0; i Add Navigation Buttons To All Pages Add «Previous Page», «First Page» and «Next Page» and «Go Back To Previous View» navigation buttons to the top of every page in the document. Contain simple function for creating a button, illustrates how to set button attributes, size, action and tooltip. Customize this script to create desired button appearance and behavior.
// Add navigation buttons to the page
// This script puts 3 buttons on top of every page (except the first one that has one button)
// First button » » : takes to the next page in the document (does not exists on the last page)
for (var p = 0; p 0)
<
AddButton(p,x,0.5,0.25,0.25,»PrevPage»,» «,»Next Page»,»this.pageNum++;»); // right arrow, next page
x += 0.3;
>
AddButton(p,x,0.5,0.25,0.25,»Back»,» Renaming Files Using Bookmark Text Use this script as an example on how to use bookmark titles to rename files. This script takes first 3 bookmarks and creates a custom filename that is used to save a file.
/* Rename Files Using Bookmarks */
// This is a script that can rename files based on bookmarks.
// If document has 3 bookmarks the output filename is:
// First bookmark From Second Bookmark – Third Bookmark
// If there are more than 3 bookmarks, then output filename is:
// First bookmark From Second Bookmark To Third Bookmark – Forth Bookmark
var fname = «»;
var bm = this.bookmarkRoot;
// make sure no illegal characters are included in the filename
var outputname = fname.replace(/[?:\\/|<>«*]/g,»_»);
// save document into c:/data/ folder
// IMPORTANT: replace with a desired output folder location
this.saveAs(«/c/data/» + outputname + «.pdf»);
// replace /c/data/ with a desired folder path where to store extracted files
var folder = «/c/data2/»;
var outputpath = folder + outputname + «.pdf»;
this.saveAs(GetUniqueOutputFileName(outputpath));
/* Create a bookmark report */
function PrintBookmark(Report, Bm, nLevel)
<
// write a name of the bookmark
var inch = 72;
Report.writeText(Bm.name);
// This script converts all StrikeOut (cross-out) annotations into Highlights
// The similar approach can be used to convert between all 3 text markup
// annotations types: Highlights, Underline and CrossOut
Applying actions and scripts to PDFs
某些 Creative Cloud 应用程序、服务和功能在中国不可用。
About actions
You can cause an action to occur when a bookmark or link is clicked, or when a page is viewed. For example, you can use links and bookmarks to jump to different locations in a document, execute commands from a menu, and perform other actions. Actions are set in the Properties dialog box.
For bookmarks or links, you specify an action that occurs when the bookmark or link is clicked. For other items, such as pages, media clips and form fields, you define a trigger that causes the action to occur and then define the action itself. You can add multiple actions to one trigger.
The Locked option prevents the appearance and actions associated with an object from being accidentally changed.
Add an action to bookmarks, form fields, buttons, or clips
Using the Hand tool, right-click the bookmark, and choose Properties.
Using the Tools > Rich Media > Select Object tool, double-click the link, media clip, or form field, and choose Properties.
Click the Actions tab.
From the Select Action menu, select the action type to occur, and then click Add. You can add multiple actions; actions execute in the order that they appear in the Actions list box.
(Optional) Select an action in the Actions tab, and use the buttons to reorder, edit, or delete the action.
Click OK to accept the actions. To close the Rich Media tool, click the cross icon at the right-end of the toolbar.
Add actions to page thumbnails
To enhance the interactive quality of a document, you can specify actions, such as changing the zoom value, to occur when a page is opened or closed.
Click the Page Thumbnails button on the left.
Click the Actions tab.
From the Select Trigger menu, choose Page Open to set an action when the page opens, or choose Page Close to set an action when the page closes.
Choose an action from the Select Action menu, and click Add.
Specify the options for the action, and click OK. The options available depend on the action selected.
To create a series of actions, choose another action from the menu, and click Add again. Use the Up and Down buttons to arrange the actions in the order you want them to occur.
If you set an action that switches to Full Screen view on Page Open or Page Close, the next time the same page opens or closes, Full Screen view is turned on.
Close all opened dialog boxes, if any. Click the cross icon at the right-end of the toolbar to close the tool.
The Acrobat JavaScript Console (Your best friend for developing Acrobat JavaScript)
Learn how to code Acrobat JavaScript, including testing and debugging code with the Acrobat JavaScript Console window.
By Thom Parker October 28, 2013
The Acrobat JavaScript Console Window (a.k.a. the Console Window) is one of the many tools included in the Acrobat JavaScript Debugger Dialog (Figure 3). The Console Window is the best of the bunch. The other tools are very useful and have much better performance and stability in Acrobat XI than in previous versions. However, the Console Window remains many times faster and easier to use than the other tools, as well as being error free.
The Console Window is a multi-purpose and somewhat generic tool. It is the default location where JavaScript error messages are displayed as well as being an entry window for testing and debugging Acrobat JavaScript code. It can also be used to execute code snippets to automate tasks in Acrobat and to analyze documents. It does not do everything needed to debug code, but it does provide a quick and easy way to perform most of the code development tasks you’ll ever need to do. In this article, we’ll cover setting up and using this essential tool.
Note: Special instructions for using the Console Window with Reader are provided at the end of the article.
Setting up the Console Window in Acrobat XI
If this is your first time using the Console Window, you will need to enable and configure it from Acrobat’s Preferences settings. Depending on your platform, use one of the following methods to open the Preferences dialog (Figure 1).
| Acrobat Preferences | ||
| Platform | Shortcut | Acrobat Menu Item (Acrobat 6.0 and above) |
| Windows | Ctrl + K | Edit > Preferences |
| Macintosh | Command + K | Acrobat > Preferences (On Application menu) |
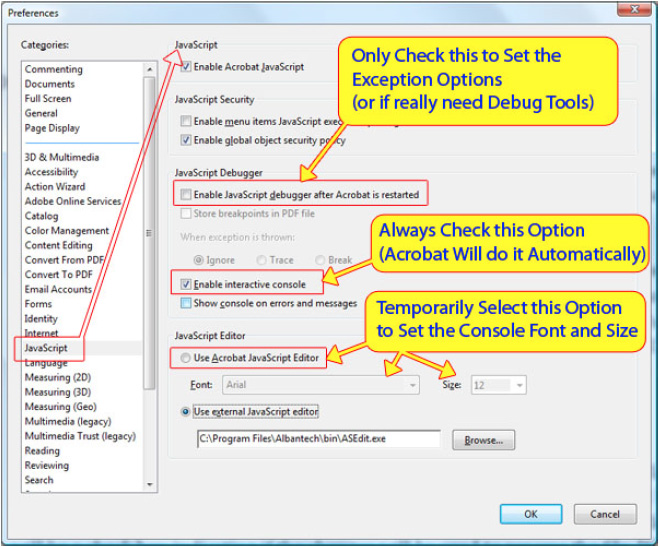
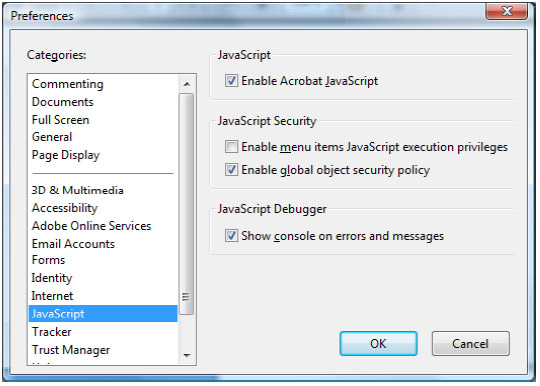
In Preferences, select the JavaScript panel. Make sure both Enable Acrobat JavaScript and Enable interactive console are checked. These are the two most important preference settings. In fact, both of these settings may already be checked. JavaScript is turned on by default, and Acrobat will automatically ask you if you want to turn on the Console Window if you attempt to use it.
It is not a good idea to check Enable JavaScript debugger after Acrobat is restarted, except in two situations. First, you can enable it temporarily in order to change the «Exception» options. I prefer the options as they are shown in Figure 1, but uncheck this option before exiting the preferences. The reason for not enabling the debugger is because it has a significant negative impact on Acrobat performance, and can even cause Acrobat to crash. So the only reason you would actually turn on the debugger is if you needed to use the debugging tools. If you don’t already know how to use software debugging tools, you are much better off sticking to the Console Window.
A very useful feature is the external JavaScript editor, since the default Acrobat editor is very basic. A good JavaScript editor will have advanced features that make code manipulation and navigation easier when you are editing document code. You won’t be using the JavaScript editor with the Console Window, but this group of settings has an interesting effect on it. The Acrobat editor font and size settings are the same settings used in the Console Window. You can see in Figure 1 that I have chosen to use an external editor. This selection disables the Acrobat editor and grays out the font and size settings. However, these are still the settings used by the Console Window. If you want to change them you’ll need to temporarily enable the Acrobat editor to modify the settings, then reselect the external editor. In order for the settings to take affect you’ll need to close and reopen the Console Window.
After these preferences have been set (Figure 1), you’re ready to start using the Console Window.
Figure 1 Acrobat XI Preferences for Enabling the JavaScript Console
Activating the Console Window in Acrobat
The shortcut key can be a bit tricky on the Macintosh because there are slight differences between the keyboards on laptop and desktop systems. So the keyboard shortcut is not always valid, but the tool button will always work.
Figure 2 Displaying the Console Window in Acrobat X and XI
The tool panels are a new feature introduced in Acrobat X, so displaying the Console in earlier versions is slightly different. The Shortcut key is the same, but instead of a tool button, these earlier versions use a menu item.
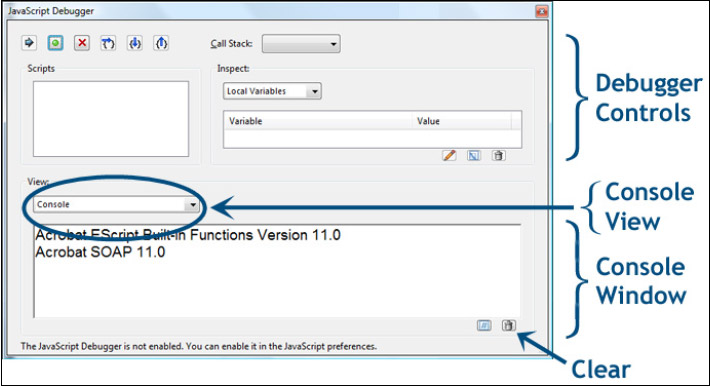
The activated Debugger dialog window is shown in Figure 3 below.
Figure 3 Acrobat XI JavaScript Debugger, Console Window selected
The Console Window section of the Debugger is in the bottom portion of the dialog, in the area labeled View. In Figure 3, the View pull-down selection list is set to Console, meaning the Console Window is being shown. This area is also used to show the Script window (for displaying runtime code when the debugger tools are enabled). In the figure, the Console is being shown immediately after Acrobat was started. The status messages are displayed by code built-into Acrobat and loaded on startup. Each line represents a JavaScript module loaded by Acrobat. If there were any problems with these modules, or any others that Acrobat loads, error messages would also be displayed here.
Normally, we’re not interested in these initial messages. So if you would like to try out some of the code presented here as examples, then clear the window by pressing the button that looks like a garbage can in the lower right corner of the window. Now we have a clean work area and are set up and ready to start using the Console Window.
Using the Console to run code
JavaScript code can be executed directly from the Console Window. This ability is a huge time saver since it provides a fast and easy way to test out code before it’s placed into a scripting location where it will be more difficult to debug.
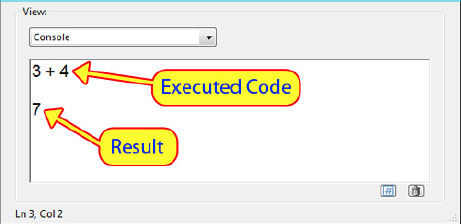
Let’s try out some simple examples. Enter the following line of code into the Console Window.
To run the code, make sure the cursor is on the same line as the text. You can place it anywhere on the line as long as nothing is selected. Either of the two following actions will cause Acrobat to run the code.
Acrobat displays the result of the execution on the next available line, also shown in Figure 4.
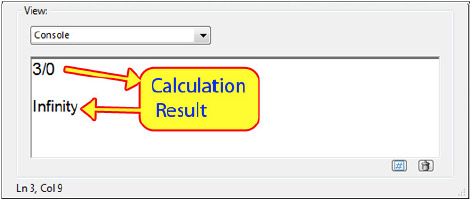
Figure 4 Simple Calculation in the Console Window
Acrobat always attempts to convert the result of an execution into text so that it can be displayed. Sometimes the result of an operation is not as clean or obvious as a number. Let’s try something that doesn’t have such a well-defined result. Enter the following line in the Console Window and run it:
This calculation has an obvious mathematical error, but Acrobat JavaScript doesn’t display an error message. Instead, as shown in Figure 5, it displays the word «Infinity.» In this case, the result of the mathematical calculation is not quite a number. «Infinity» is a valid value in JavaScript and it can be used in both logical and mathematical expressions, but values like this can cause a script to have a problem if they are not properly handled. It is much easier to find this kind of issue by executing individual lines in the Console Window where you can see the results immediately, than it is to debug it from a field-calculation script.
Figure 5 «Infinity» is a problematic, but valid value.
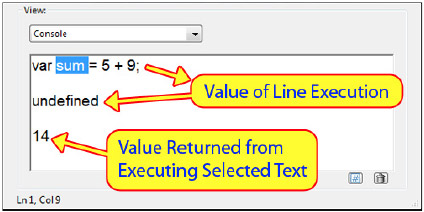
The next line of example code is something that might be used in a real script. It assigns a simple addition to a variable named ‘sum’.
As shown in Figure 6, the return value from this line of code is «undefined.» This is not the return value from the calculation. The calculation is executed and applied to the declared variable, sum. However, the first and primary operation on the line is the variable declaration, so this is the operation that returns a value to the Console Window. Unfortunately, variable declarations do not return a value. To overcome this small issue, the Console widow displays «undefined.» This is same message displayed for any operation that doesn’t return a value, or for variables that have never been declared. Anything that doesn’t exist to the JavaScript environment is «undefined.»
To display the value of the sum variable, use the cursor to select just the word sum, as shown in Figure 6, then press Ctrl+Enter (Command+Enter on Mac). This action executes just the selected text.
Figure 6 Variable assignment in the Console Window
This technique of selecting parts of the code for execution is also useful for executing multiple lines of code.
So far we’ve talked about executing code in the Console Window for testing and debugging, but there is no reason to restrict our usage to this limited theme. The Console Window is an «Immediate Mode Command» window. Immediate Mode means that anything entered into this window is executed directly by the JavaScript engine. We can use it anytime we want to execute code for any purpose.
Two uses for the Console Window (besides code testing) that immediately come to mind are automation and analysis. There are several functions in Acrobat for manipulating and for acquiring information from PDFs and Acrobat. Most of these JavaScript functions have Acrobat menu-item and/or tool button equivalents, but a few don’t, so for these operations the Console Window is the only immediate access. For operations with a user interface button or menu item, the main advantage of using JavaScript is greater flexibility, since JavaScript functions typically provide more options than the user interface equivalent. For example, suppose you wanted to know the exact border color of a text field so you could use the same color in another location. Assuming the current document has a field with the correct name on it, the following code displays the raw color value in the Console Window:
The result of this operation is a color array. Remember, Acrobat attempts to convert all results into text. Arrays are converted to text by converting each individual array element into a text string, so the result would look something like the following line when it is displayed in the Console Window.
This is an example of document analysis with JavaScript. We’ve just found out something that would have taken us just a little more effort to find out using the Acrobat property dialogs, and the information is in a very usable format. We can easily copy and paste this information to accomplish some other purpose, for example applying the color to another field with this line of code:
The real advantage is that by using JavaScript, we can automate this analysis for the entire PDF. Suppose a document needs to be checked for branding purposes, i.e., all the border colors of all fields in the document should match a special color. The following code uses a simple loop to display this color info in the Console Window for manual inspection:
Because of the loop, this code cannot be executed one line at a time. It has to be done all at once. To execute multiple lines of code, the lines must all be selected before pushing Ctrl+Enter (Command+Enter on Macintosh) to start running it.
Notice that in the loop there is a function called console.println(). It’s in the fourth line. This function writes text to the Console Window and it will be discussed in the next section.
Here’s an example of a function that does not have an easy equivalent on the regular Acrobat menus and toolbars. Enter the following line into the Console Window and run it:
Acrobat will create a new, blank PDF document. This is perfect for trying out new ideas before applying them to a working document.
The results of this operation are shown in Figure 7 below. Note that yet again, the result is something different.
Figure 7 Object values are complicated, so they display as a text description.
The Console Window has to convert the result of code execution to text before it can be displayed. Not everything has an obviously meaningful text representation. In this case, the output of the function is a Document Object. Objects are converted to text by simply converting their type information to a string.
The result shown in Figure 7 tells us the type of object created. This result is only useful in letting us know the function worked. If app.newDoc() had failed, it would have either caused an error (discussed farther on in this article) or returned null. Both of these situations would have been displayed in the Console Window.
Enter and run the following line of code:
The path property is exactly what you might think it should be. It’s the folder path of the current document. Since the current document was just created with app.newDoc() and has not been saved, this path is for the temporary PDF. The result will look something like this:
Of course, this information is easily available in the Document Properties dialog. The advantage to using the Console Window is to make this information available to copy to the system clipboard for use with another script in Acrobat or for something else.
Using the Console to display status and error messages
Besides testing code, the Console Window has one other important role in debugging JavaScript. It is the standard location for displaying status and error messages. The Acrobat JavaScript environment has a built-in error handling system. When something goes wrong, this error-handling system usually displays some helpful message (sometimes) in the Console Window, so this is the first place to look when things aren’t working. In addition, you can create your own status and error messages to display here.
As an example, let’s execute something that will cause an error. Enter and run the following line of code in the Console Window:
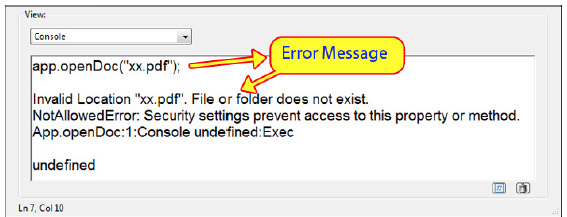
This line of code instructs Acrobat to open a file (xx.pdf) that does not exist, an obvious error (if by some chance you actually have a file with this name, please change the code to use something that’s not on your system). Acrobat responds by generating an error, which is displayed by the Console Window, shown in Figure 8.
Figure 8 Acrobat XI error message, generated by a bad file path parameter
The first line of the error message states the file name and/or path is invalid and the last line indicates the script location and the line number of the failing code. This message is critical to understanding why the code failed, especially if the function call is buried in several lines of code inside another script. Always check the Console Window first when something goes wrong.
Note that the second message on the line indicates a security error. For our purposes, this is an erroneous and unhelpful message. There was no real security error, and while it may then seem that Adobe is deliberately trying to either terrify or confuse us, there is a reason the message is being displayed. In fact, the message is not related to the JavaScript engine at all. It is the result of the Acrobat security model, which was made much more robust in versions 9, X, and XI by adding a security layer. This layer blocks operations that don’t fit with Acrobat’s sense of rightness. JavaScript operations or errors that relate to external resources (on the web or local file system) tend to spook this security layer, which then throws out miscellaneous security errors. If you work with Acrobat JavaScript for any length of time, you’ll find all sorts of operations that have nothing to do with security, but nonetheless generate security errors.
We can also create our own messages for display in the Console Window. The Console Window is defined as an object in the Acrobat JavaScript DOM (Document Object Model). This object provides a few functions for manipulating and accessing the Console Window, but for our purposes here the console.println() function is the only one of interest. This function displays a single line of text on the next available line in the Console Window. The following line of code displays the words «Hello Acrobat.»
The console.println()function is particularly useful for monitoring how code is working. Just place a few console.println() statements at critical locations in your script and you can literally watch the progression of code execution in real time. It is up to the developer to decide what information to display. This information should be relevant to the state of the script.
For example, the following line helps us understand how JavaScript events work in Acrobat. The code can be placed in any script location in a PDF file. Try it out by putting several in different locations in a PDF, a Document script, a Page Action, different JavaScript Field Actions, and so on. It is a good practice to use this code (or something like it) whenever you start a new document scripting project to get a feel for how the different scripts will interact.
Watch the Console Window to monitor the sequence of scripts that are executed as you open and close the document, navigate between pages, move the mouse around the document or perform other actions.
Setting up the Console Window in Adobe Reader XI
If you are developing scripts that will be used in Adobe Reader, then it is a good idea to be able to test and debug them in Reader. Adobe added Console Window support to Reader in version 7. However, setting up Reader to actually display the Console Window was very difficult. It required installing special scripts and manually changing Acrobat settings in either the Windows Registry or the Macintosh settings files. It has become much easier in Reader XI. There is only one thing you need to be able to do to use the Console Window, and that is to display it.
Displaying the Console Window in Reader is a bit more difficult than one might think it should. Reader does not have the keyboard shortcut, a menu item, or a tool button for displaying the Debugger Window. This leaves only two options: create your own tool button or menu item or cause a deliberate error.
Figure 9 Error messages are an effective way to display the Console Window
Let’s look at the second method first. Both Acrobat and Reader include a Preference for displaying the Console Window on an error message. Figure 9 shows the Reader XI JavaScript Preferences dialog. By default, there is only one option on it relating to the JavaScript Debugger, which is to «Show console on errors or messages.» Don’t be fooled by this wording. Only an error will automatically display the Console Window. This option is fine for basic debugging, i.e., you have a bug that throws an error and the console is displayed so you can see it, but what do you do if you want to use the Console for running code? Or for viewing messages that aren’t errors? One solution is to deliberately throw an error by placing this code in some strategic location, such as a document or button script.
This is how you throw exceptions in JavaScript. But it isn’t the best method. A better technique is to create a tool button or menu item that displays the console directly with the «console.show()» function. You can download a script for a tool button here,
And here is a handy script for adding a «Console Window» menu item to the «View» menu in Reader. This script will need to be written into a file with the «.js» extension and then placed in one of the Acrobat JavaScript Folders. It is best to place it in the «User» folder.
Summary
All in all, the Acrobat JavaScript Console is the greatest thing since, well, Acrobat JavaScript. Use it early and often to test and debug scripts, and to automate processes in Acrobat.


